A .NET Framework assembly containing resources specific to a given language. Using satellite assemblies, you can place the resources for different languages in different assemblies, and the correct assembly is loaded into memory only if the user selects to view the application in that language. In general, assemblies should contain culture-neutral resources. If you want to localize your assembly (for example use different strings for different locales) you should use satellite assemblies.
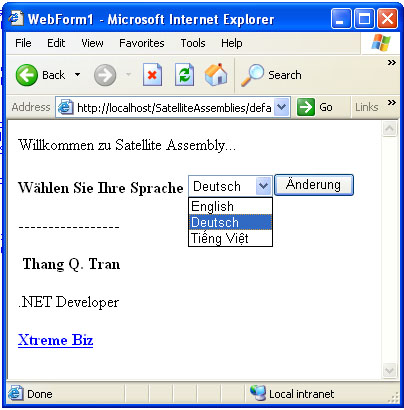
This means that you develop your application in a default language and add flexibility to react with change in the locale. Say, for example, you developed your application in an en-US locale. Now, your application has multilingual support. When you deploy your code in, say, India, you want to show labels, messages shown in the national language which is other than English.
Satellite assemblies give this flexibility. You create any simple text file with translated strings, create resources, and put them into the bin\debug folder. That's it. The next time, your code will read the CurrentCulture property of the current thread and accordingly load the appropriate resource.
Creating a Satellite Assembly
- Create a folder with a specific culture name (for example, en-US) in the application's bin\debug folder.
- Create a .resx file in that folder. Place all translated strings into it.
- Create a .resources file by using the following command from the .NET command prompt. (localizationsample is the name of the application namespace. If your application uses a nested namespace structure like MyApp.YourApp.MyName.YourName as the type of namespace, just use the uppermost namespace for creating resources files—MyApp.)
- In the code, find the user's language; for example, en-US. This is culture specific.
- Give the assembly name as the name of .resx file. In this case, it is Strings.
resgen Strings.en-US.resx LocalizationSample.Strings.en-US.resourcese.Strings.en-US.resources /out:LocalizationSampleal /embed:LocalizationSampl.resources.dll /c:en-US
The above step will create two files, LocalizationSample.Strings.en-US.resources and LocalizationSample.resources.dll. Here, LocalizationSample is the name space of the application.
Using a Satellite Assembly
Follow these steps:
Thread.CurrentThread.CurrentCulture =CultureInfo.CreateSpecificCulture(specCult);Thread.CurrentThread.CurrentUICulture =nager resMgr = new Resourcnew CultureInfo(specCult); ResourceM aeManager(typeof(Form1).Namespace + "." +pe().Assembly); btnTest.Text = resMgr.GetString("Jayant")asmName, this.GetTy;
That's it. See how simple is it to create a satellite assembly and use it in your code.
Here's how to use a satellite assembly if your assembly is a strong named assembly. When you create an assembly with a string name, all the assemblies it refers to must have a strong name. This is true with a satellite assembly also. Here are the steps to create a strong named satellite assembly.
String Naming a Satellite Assembly
al /embed:ExploreDotNet2005.Strings.en-US.resources/out:ExploreDotNet2005.resources.dll /c:en-US/../.. /KeyPair.snk/template:../ExploreDotNet2005.exe /keyfile:..
Remember that /template is very important because it inherits the parent assembly manifest, and the strong name key pair must be the same as that for the running assembly. I've tried using different strong names for satellite assembly and executing the assembly. but it throws an exception
If your application does not deploy resources in satellite assemblies, you can access .resources files directly. Use the ResourceManager.CreateFileBasedResourceManager methodto specify a directory containing loose .resources files. With this approach, it is not necessary to store all the resource files in separate subdirectories, because you will give the resource files different names based upon the cultures they represent. It is good practice, however, to place all the resources for an application in a single subdirectory of the main application directory. The following illustration shows where resource files should be located in the directory structure.
Application directory containing .resources files

After you have created your resources and placed them in the appropriate directory, create a ResourceManager to use the resources. The following example creates aResourceManager. The first parameter specifies the resource file baseName. The second parameter specifies the location of the resources. The third parameter specifies theResourceSet implementation to use. If the third parameter is null (C#) or Nothing (Visual Basic), the default runtime ResourceSet is used.
No comments:
Post a Comment